How to Make a Furry Head Easy
Tutorial: Building a Fursuit Head with Foam

Building a Fursuit Head with Foam
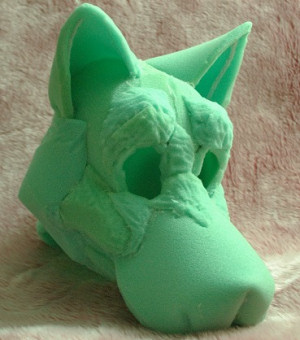
This is one of my favorite methods of creating a mask, there are many other techniques to try, but this is how I create mine. Half inch thickness foam is used to build your animal character by folding, curving, and layering the foam pieces.
Hopefully the descriptions and pictures will help guide you in creating your own costume.
Materials
Needed
- 1 yard of half-inch thickness foam
- Scissors
- Hot Glue Gun and glue sticks
- Permanent marker
Recommended
- 3 or 4 clothespins
- Razor knife
- Measuring tape
- Thicker foam for features
- Paper (for eye template)
- Pins
- Fleece (for finishing the mouth)
- Liner fabric (for lining the inside)
- Start by either measuring around your head with a measuring tape, or wrapping the foam around your head for a comfortable fit. You want it to be a little loose, able to slide it on and off without catching your ears or nose. You want the first piece to be about as tall and wide as your head. Glue the edges of the foam piece together to make a tube-shape you can slip on and off your head. If you work quickly you will be able to glue longer edges, but it is also easy to spread it over a few inches at a time and let it cool, and work the next few inches until the edge is firmly glued. Pinch the edges together to get good adhesion, however be careful around the hot glue.
- Line up the seam so it is at the front of your future mask and mark the location of where the eyes will go with a permanent marker. Use your scissors or razor knife to cut the initial eye openings, you can increase the size of your eye openings as you work and get a better idea of where the features will go.
- Round out the top of the head. You can do this a few different ways – I think this is probably the hardest part to describe – One way is bringing in the top edges and tacking it down in the center, then snipping off the extra foam, basically manipulating it until it is a rounded shape. Alternatively you can trim the foamwork so you have four tapered arches to bring in at the center and glue together to make the top hemisphere of your mask. Match the arches up with eachother so they meet at the edges as you fold them together. Trim off any bumps to smooth out the top. The goal is to make the top of your head round with no abrupt squared edges or "conehead" appearance.
Tip: You can poke the foam in and pinch it from the inside to smooth out sections as you apply glue to the outside, you can use clothespins to hold it together as the glue cools. - At this point, it helps to have reference photos or a drawing of the animal or intended character that you're making the mask of so you know what size facial features should be – a short muzzle on a cat, or a snout on a wolf for example. Photo references of your animal inspiration is very important even when working with a toony mask so you can exaggerate existing features and get proportions and shapes close to the animal species you want to portray. There are several ways to approach a muzzle.
To change the angle of thestop, or slope of the forehead of the animal, you can add reinforcing pieces overlapping the snout and the headbase between the eyes. Shape these pieces to accommodate your vision, some animals have a gradual slope with no stop, other animals have a very pronounced stop. Be sure to check your photo references to see how much you need to build up that area for an animalistic shape! Layer up foam shapes (see step 5 photos) then trim them with scissors to smooth out the edges.
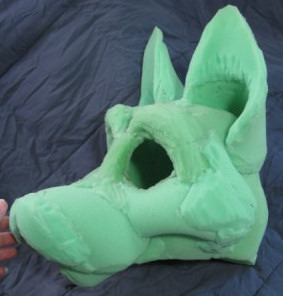
The lower jaw can be formed by a strip of foam curved around and anchored to the headbase, cut out a platform for the inside of the mouth from foam and glue it together. I normally make my jaw shorter than my muzzle, and if possible I make the muzzle overhang it to increase ventilation. Furring the top and lower jaw will add bulk and make that gap even narrower. It does not have to be as dramatic as my example image, but even a little bit of a gap between your jaw and muzzle helps!
Cut away the wall of foam between the wearer's face and the inside of the mask's mouth. You want this wall completely removed for ventilation, you want as much space to breathe as possible to make your costume practical to wear for any period of time. If you have a muzzle carved from thicker foam, hollow it out as much as you can to increase airflow out the mouth of the character. It is safe to hollow it out to up to a half an inch thickness
- Decide on what kind of expression your critter will have. Happy? Angry? What emotion do you want your character to portray? Pick an emotion and work with it! Create cheeks by layering foam together, you can glue together areas by spreading the glue around and sandwiching the pieces together, overlap areas like the muzzle underneath the eye a little bit to give additional stabilization to the muzzle..
Round out the edges by trimming and snipping away the foam with scissors. Build up the sides of the face with layers of foam to make the character have fluffier cheek edges. Keep in mind the faux fur will add a lot of thickness to this shape by at least a half an inch, the foam helps guide where your fur should stick out and be shaped. - Add eyebrow ridges to help emphasize the expression and shape of your critter's head. Begin by planning the size and shape of your eye by making a paper template (I believe adding the eyes is bestafterfurring, see my tutorial on eyes here, but planning where they will go helps immensely). Plan where your eyes are to go and decide how they need to sit in the head to look best. If you need to build up the sides of the head, layer pieces of foam to bulk out that area.
- In myvideo tutorial I added the ears before the facial features. I now add ears after the muzzle, around the time cheeks and eyebrows are fleshed out. Adding ears at this step aids in having a reference point for getting the size, position, and shaping just right. I recommend creating ears that have a cone shape to them so a vent inside the ear into the head can be incorporated, additionally the cone-shape is closer to real animal ear shapes. The conical shaping seems more structurally sound compared to a completely flat ear. Even animals with smaller ears have a conical shape.
Tip: Check lots of photos of the animal you are building to see the different ear positions. An alert animal will have ears closer on the top of their head. A tired animal will have them far apart and to the side. A nervous animal may have them folded back. Ears are a good additional way to convey your character's emotion!
Ears can be worked out by manipulating a drawn and cut-out paper template or working directly with the foam. Pointed erect ears can be started from a triangle shape with a rounded bottom. Small or round ears can be started from half-circles and strips of foam can be attached to the ear edges or to the front or back of the ears to increase the shape and depth. When adding ears it helps to have straight pins available to manipulate the inside edge and outside edge of the ears. You can pin the inside edge down and then bend and curve the outside edge. You can also tack down the inside edge first, and then adjust the outside edge to get a nice conical shape. Use scissors to adjust the shape.
Tip:A note on positioning. The inside edge – the edge closest to the forehead – is normally further forward on the animal's head. The outside edge – the edge closest to the cheek – is normally further back by just a little bit. Keep that in mind when positioning your ears.
Check references to see which direction the tips of the ears should point on your creature – imagine the eartips as hands on a clock – and match them up with a reference point like the eyes or sides of the head. For example, Huskies have ears that point at "noon", while a housecat may have ears that point at 11 and 1.
Floppy ears can be made as a conical base of the ear with either the tip of the ear cut off and the eartip then later sewn, or with the the area of the flop trimmed thin and then the tip weighted with a coin or other weighted thin object. - Re-asses your eye openings and the fit of your headbase by trying it on to be sure you can see well and that it fits well, make adjustments as needed. If you have limited vision at this point it will be even worse once fur and eyes are added, so you want vision to be very good. If you have limited ventilation at this point, carve out the areas that are blocking breathing, it will be worse once fur is added. Cut out your ear vents, the pile of the fur will help hide your vents, but also that conical shape of your ears. Some ear vents are able to be bigger than others. The vents allow another place for hot air to escape as the costume is worn.
Have a friend take a photo of you or take a peek in the mirror to ensure symmetry and that you are satisfied with the appearance. It is likely you still have extra foam material on the back and sides of your head that you need to trim up and taper in to better fit your headbase to your head. Cut away some of the foam from the bottom of the headbase to offer a greater access into the neck of the wearer's head. Then adjust the roundness of the back of your headbase by cutting one or more triangular darts and gluing them back together in the back and side of the headbase to round it out. As for how big and how many darts to cut, start small with a narrow (width) by tall (height) triangular sliver cut out to see how it affects it when you glue it back together. If you like that, the more cuts in the foam you make the more even all the way around it can be, the more width you cut out the more drastic the shape is affected. This is best experienced through experimentation and you can find a nice balance for changing the roundness of the head.
You can remove most of the bulk by the lower neck behind the head to still be able to fit your head inside the head opening and then trim the rest away by holding your scissors sideways to the long edge and trimming off long strips to slowly begin rounding it out, you can also do this to the edges of your ears and the opening of your muzzle and jaw to round them. You can then layer a foam piece on the back of the head too, if you feel it needs to be rounder. Make sure you can still comfortably slip the head on and off after tapering the back-of-the-head shaping, you want to be able to get it on and off very easily, since adding the neck in fur will not stretch as easily as the foam by itself. - Once fur is applied small gaps in the foam will not be noticeable. Your surface does not have to be perfectly smooth, however it should not be choppy, square or bumpy or you will be able to feel and possibly see it when furred, and it may affect how even your shave can get when it comes to shaving your muzzle fur. Snip off any gluey-bumps or high points. Now is a good time to line the inside of the mouth or the head! I line my heads before I fur them so I can have easier access to attach the inner liner material.
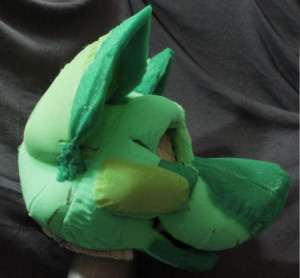
Fleece is used to line the lower jaw, a tongue can be added later. You can also line the upper jaw with fleece, too! To line the rest of the head you can sew a dome shape from your choice of fabric (You can create a shape similar to the shape in step 3, but in fabric!) that your head fits inside comfortably, stretchy fabric like Lycra works nicely so you can press it into the interior, I prefer quilted broadcloth since it has attached batting that offers a nice thick barrier that I can wipe clean with a damp cloth after wearing and I believe it helps direct the airflow out the mouth and ear vents because of its smooth surface. I recommend using a liner material that is smooth so it does not hold heat in like a fuzzy material would.
Place your liner inside, and pin it in place through the foam. Use sharp scissors to snip an opening in the foam to stick the tip of a hot glue gun inside and begin attaching your liner by gluing through the slit in the foam to the liner. I basically attach it from gluing through the outside. Re-close the slit with a little extra hot glue. I tack down the liner every few inches with this type of technique, and then simply glue it down around the mouth, eyes, neck and ear vent openings where I can reach with the tip of the glue nozzle. - Enjoy your handiwork! I hope you were successful, your head should now be ready to fur! See myFurring tutorialfor more information!

For more information and additional Tutorials, be sure to visit my website, Matrices.net!
- Show more notesLoading...
Source: https://pupdates.matrices.net/post/51490538463/tutorial-building-a-fursuit-head-with-foam


0 Response to "How to Make a Furry Head Easy"
Post a Comment